Showing posts with label food. Show all posts

Sunday, April 29, 2012

diy clay feathers

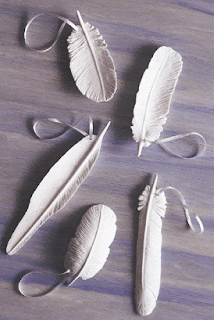
i don't know about everyone else but i'm still totally in love with feathers.  well technically i had a fascination with them since i was small child before they were cool and adults were telling me that they were infested with germs and parasites...  but anyway, when i saw these ceramic feathers i knew i wanted some!!  these feathers are $42 for the set of 5 ceramic ornaments-pretty steep but you can make them less...waaay less.

i made mine out of some cheap-o air dry clay but i was really wishing i had shelled out for some more sculpey.  air dry clay has a tendency to get all crackly if you don't finish fast enough and it doesn't hold texture nearly as well as sculpey does.  plus it warped when it dried *sigh*.  that'll teach me to try and save some money lol.  but i think the warping makes it look somewhat more featherish?  i think it'll still make a nice pendant or some other accessory.  now i'm just wondering i should add some color to it...maybe a soft blue or gray?  i will def be making more of these with some better quality clay.  


if you want to make your own all you need is some clay and a toothpick (one of those metal ceramic probe thingies would probably work better but i think i left mine in storage...).  start by taking a small piece of clay and flatten it in the shape you want your feather to be in.  i started by tracing where i wanted the center quill of the feather to be and pressed down everywhere else so that the quill was the only raised area.  then just use your toothpick and make lines down on either side of the quill.  it'll probably look weird at first but the more lines you add the better it looks, and don't worry about making every line perfectly parallel no one will be able to tell when you're done.  drill a hole, cure the clay and now you have a new feather pendant!!


on a side note...can anyone guess what i had for dinner last night, breakfast and lunch today?  and will probably have again later as a snack?  smores...that's right i had smores for 3 meals in a row...  it did lack some authenticity since i was making it over my gas burner in the kitchen but hey it was still deliciously sweet and toasted.


Sunday, March 18, 2012

i will never again use store bought hamburger buns

so i love bread..a lot.  when i was a kid my parents used to by loaves of french bread from homeland/albertson's/food pyramid/who knows what it is now, and i would eat one...a whole loaf...by myself...for lunch.  not sure what it is because most breads don't really have a strong flavor but there's something about the smell and texture that just makes me want to eat lots and lots of bread.

anyway, i found this recipe on pinterest and i hate the store bought hamburger buns so i decided to try it out.

Ingredients

  • 2 tablespoons active dry yeast
  • 1 cup plus 2 tablespoons warm water (110° to 115°)
  • 1/3 cup vegetable oil
  • 1/4 cup sugar
  • 1 egg
  • 1 teaspoon salt
  • 3 to 3-1/2 cups all-purpose flour

Directions

  • In a large bowl, dissolve yeast in warm water. Add oil and sugar; let stand for 5 minutes. Add the egg, salt and enough flour to form a soft dough.
  • Turn onto a floured surface; knead until smooth and elastic, about 3-5 minutes. Do not let rise. Divide into 12 pieces; shape each into a ball. Place 3 in. apart on greased baking sheets.
  • Cover and let rest for 10 minutes. Bake at 425° for 8-12 minutes or until golden brown. Remove from pans to wire racks to cool. Yield: 1 dozen.


so i added the full 3 1/2 cups of flour and my dough was still suuuuper sticky, i think i ended up adding another 1/2 cup (at least) but it was still pretty tacky.  i didn't want to add too much and make them tough so i just did the best i could with forming the rolls.  instead of a greased baking sheet, i just used a cookie sheet with parchment paper.  i was actually able to form 15 rolls although a couple are somewhat smaller (i blame the sticky dough).  

also, i have a gas oven which tends to heat pretty unevenly.  i set it to 400 and after 5 minutes, a couple were pretty browned on top.  and by that i mean they were burned black on the bottom (fortunately they didn't actually taste burned).  and of course the majority, while fully cooked on the inside, hadn't had a chance to brown on top.  

the buns ended up being really fluffy and tender, so much so that at first i was worried about how they would hold up against a hamburger patty.  but after i let them cool and cut them in half they seemed like okay.  they have a really simple and sweet flavor-i really like them but i could see some people finding them a bit plain.  i think this is a really good base recipe to modify into some really flavorful rolls.  


this recipe was so simple and easy-i think it actually took me less than 40 minutes!!  i'm definitely not going to be using store bought hamburger buns anymore!!