Sunday, February 26, 2012

how to add lomo light effects to your photos

Pin It  
adding lomo light effects is a cool way to give your photos a vintage vibe.  you'll need some pretty basic experience with photoshop to follow this tutorial because i didn't include any screen shots.  

 first-google lomo light effects to find some good stock photos-these are the ones i used:

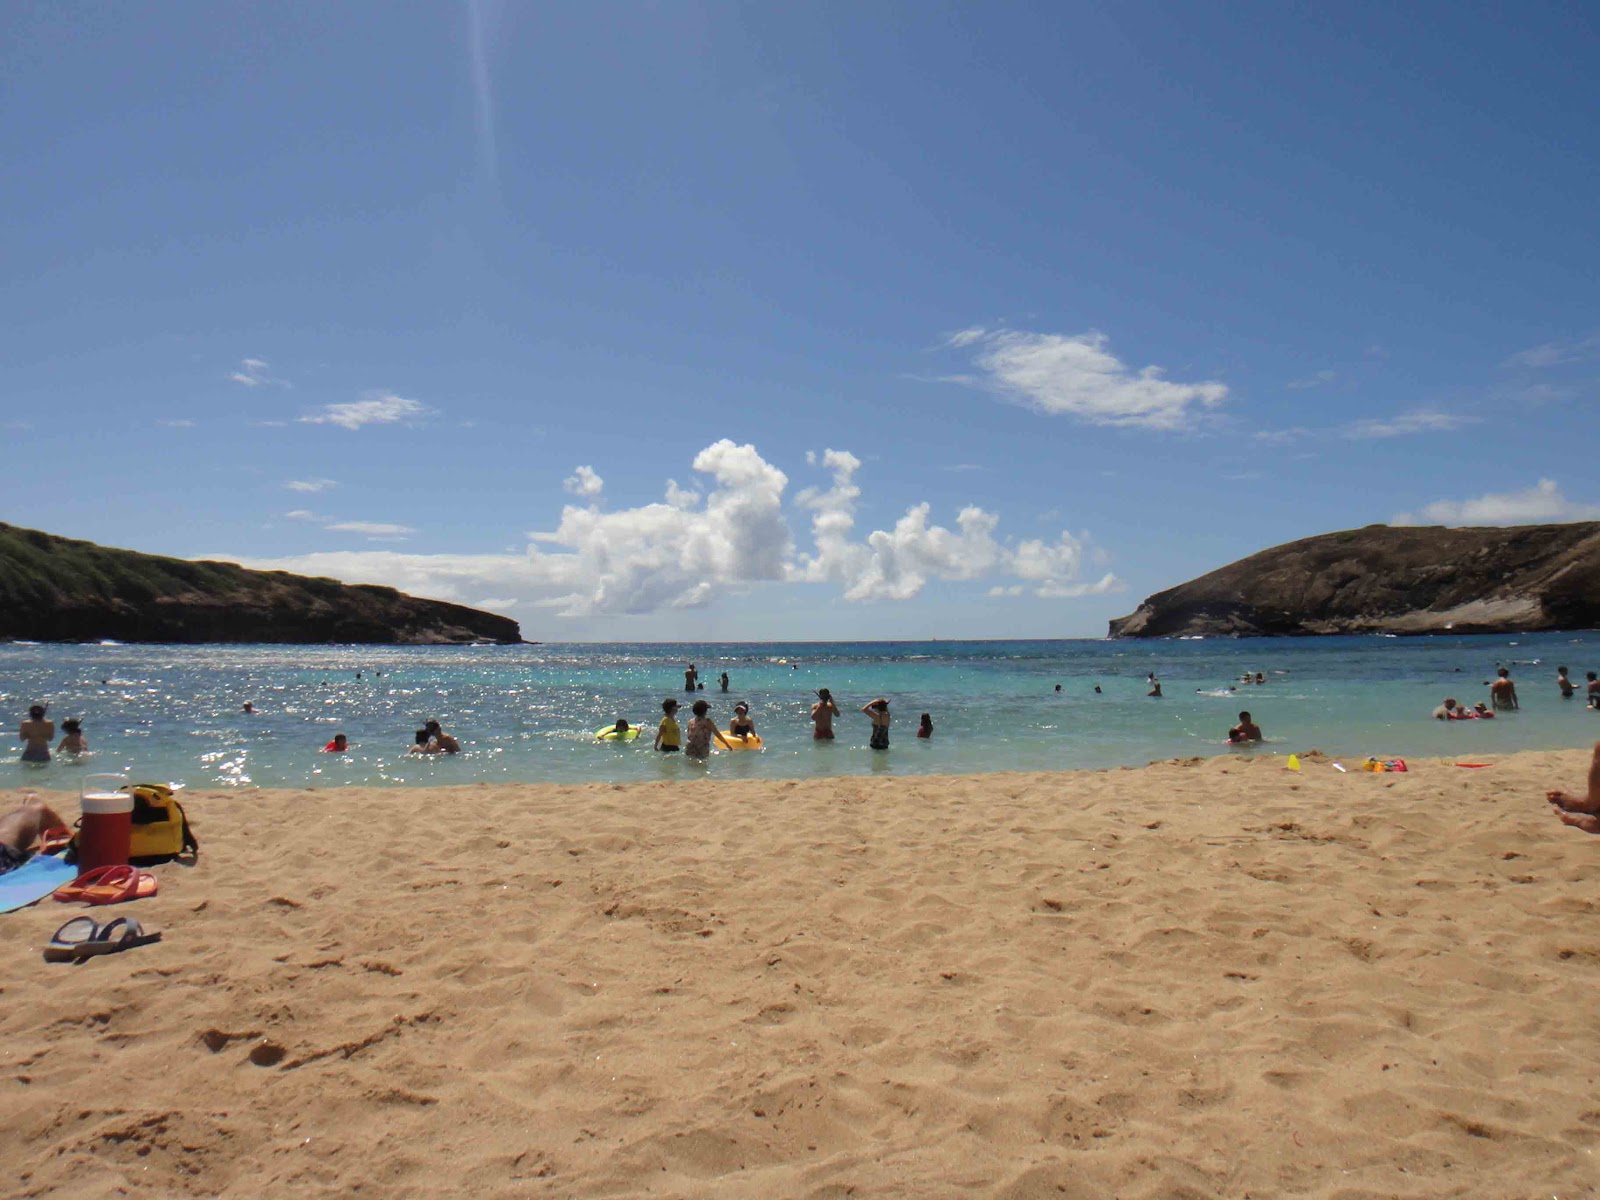
next, choose a photo that you want to modify and open in photoshop:

once it's open in photoshop, open the 'layers' window and double click on the background to turn it into a layer.  this step isn't really necessary but it unlocks the background so you can do more modifications to it.

next, go to 'File', 'Place...', and choose the lomo light stock photo you want.

there are 2 different methods-i prefer the first but it really depends on how the lomo light stock works with your photo.

with the first method, adjust the lomo light layer so that it takes up the entire image, at this point your whole picture will just look like the lomo light.  once you are done adjusting, push 'enter', right click on the lomo light layer, and click 'rasterize layer'.  

now, the layer will automatically be set to 'normal', click on this to open a drop-down window of options.  i went with 'overlay', but you can play around with the different options to see what you like best.  

at this point, your photo will look pretty dark, but you can either increase the brightness of your background layer (the actual photo), or decrease the opacity of the lomo light layer:
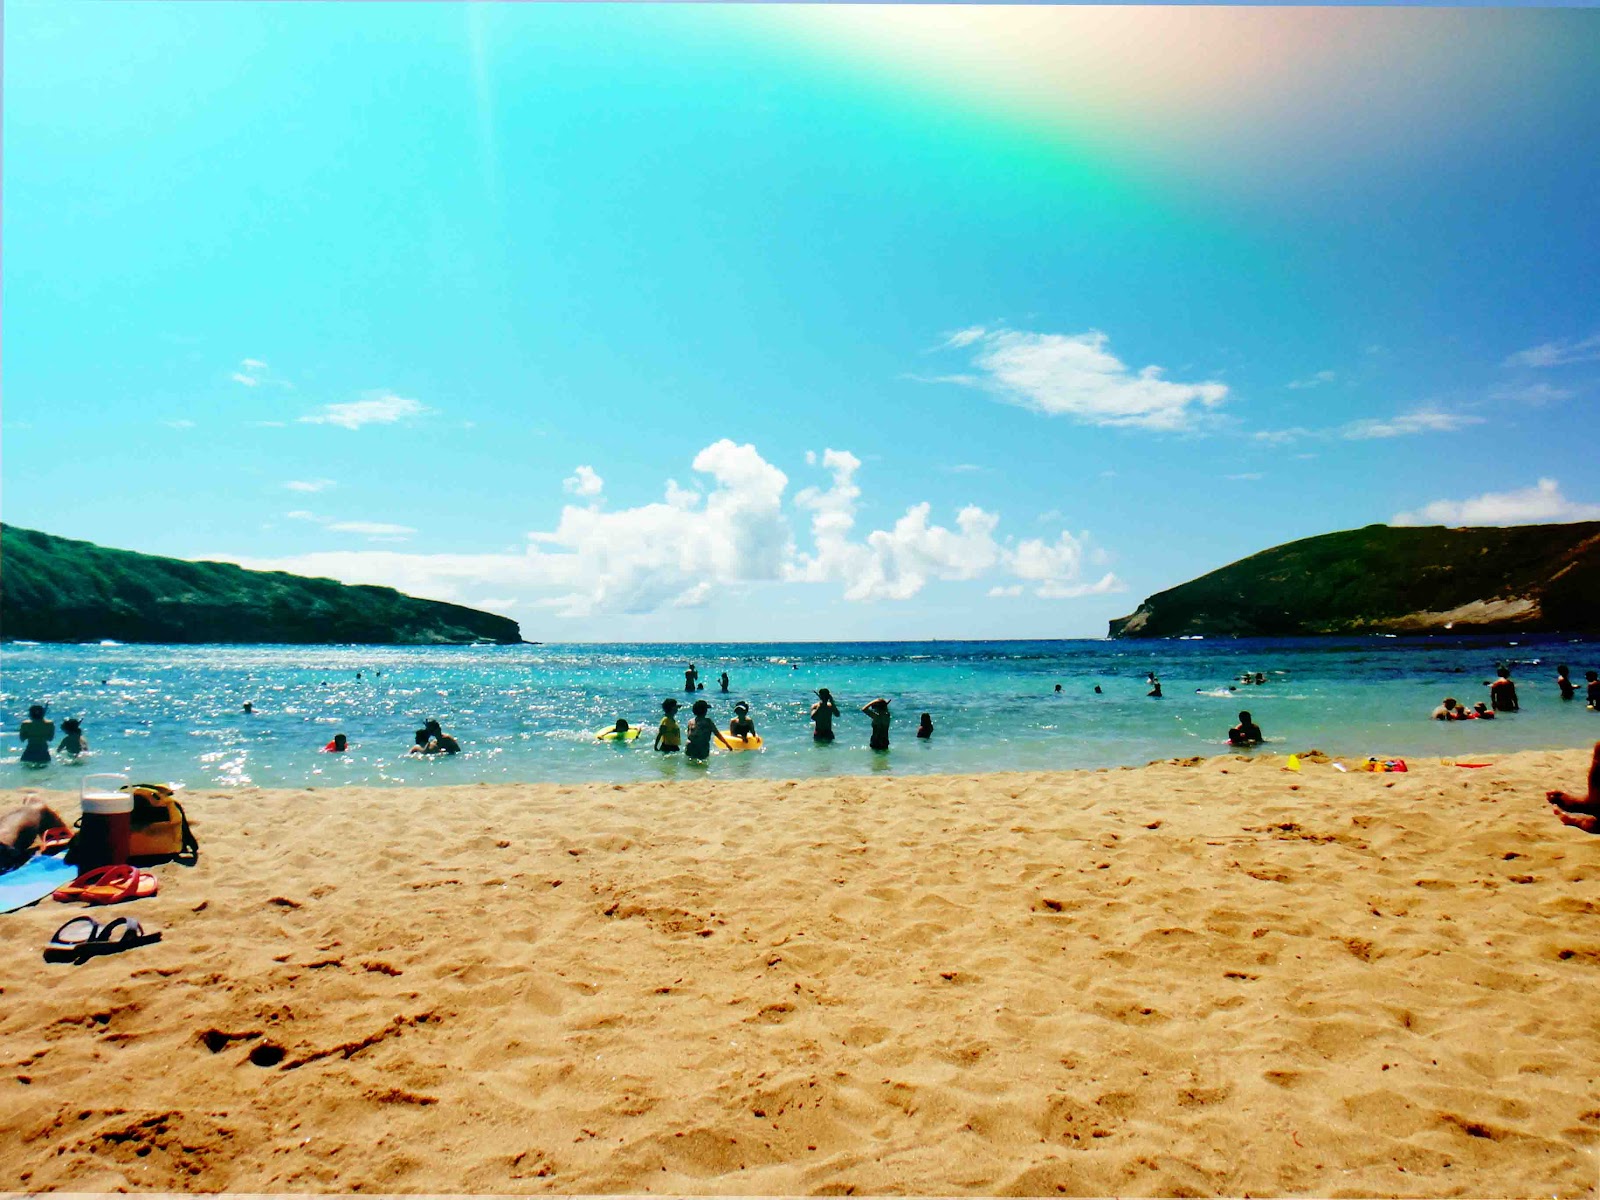
this is what it looks like after i increased the brightness of the background layer.  i thought it was still a bit dark, so i used the 'dodge tool' (it always looks like a lollipop to me...) and went over a couple places.  you can set it to midtones or shadows, and i turned the hardness down to 0%, and the exposure down to 30ish%-this helps avoid leaving a hard edge.  and the final photo:
pretty cool right?  i made this one just for the tutorial but i actually really like the way it turned out...

so for the second method-if you don't really want the rest of your photo to become darker or you really just want a small area of lomo-after you place the stock photo, adjust it so that covers only a small portion of your photo.  once you are down adjusting, push 'enter', and 'rasterize layer' like method 1.  

now, use the 'eraser tool', hardness 0%, opacity 50ish%, and erase all the black parts, or any part that you don't want on your final photo.  
i set the lomo layer to 'overlay' again here.  

and that's it!!  i always use photoshop to edit my photos but i've never used lomo before-i really like the effect and it's actually a pretty easy process.  

i think i might use this one for one of those fabric transfer projects i've seen floating around-they generally already have a pretty vintage look when transferred onto fabrics and i think this would really enhance the look.  

Sunday, February 19, 2012

freezer paper stencil tutorial


after using freezer paper to make that produce mat, i've been itching to use it for something else...  and i have a ridiculous amount of clothes, even after getting rid of a goodly amount when i moved so i decided to upgrade one of my old tees with a freezer paper stencil.  freezer paper stencil is remarkably easy, well depending on the complexity of your design, and the results are pretty good.  i was surprised by the nice, crisp lines.

what you'll need:
-freezer paper
-parchment paper
-scissors/x-acto knife
-t-shirt
-iron
-paint/paint brush

first, tear a piece of freezer paper roughly the size of your shirt or design.  you'll need a piece of parchment paper about the same size as well.  i just sketched my idea onto the matte side of the freezer paper but it's probably better to draw it on something else and then trace it onto the freezer paper.

next cut out your design, this can be pretty tedious depending on your design.  sadly the sun went down while i was cutting so all my good lighting went out the window...ah working in the dark because i'm too lazy to turn the light on...  if you have a lot of fine lines in your design i'd recommend making them a little bit thicker than you think you need to.
plug in your iron and set to medium/high heat.

now, place the parchment paper inside your shirt directly underneath where you'll be placing your stencil.  line your stencil up on top of your shirt, shiny side down.  using a press/lift/press motion (not a sliding motion) iron your stencil to your shirt.  make sure you get a good seal otherwise your paint will leak.  if you have any separate pieces or free floating pieces iron them last.
now for the paint, i used a speedball screen printing paint, but you could probably get away with acrylic.  i mean any time i get acrylic paint on my clothes it never comes out...  i used more a dabbing motion rather than actual strokes mostly because i didn't want part of the stencil to catch on the brush.  now wait for the paint to dry...

...

double check you didn't miss any spots with the paint, and once it's dry you can peel off your stencil.
if you need to heat set your paint, just use the same piece of parchment paper, place it on top of your design and iron for 3-5 minutes.  keep the iron moving to avoid scorch marks.  flip your shirt inside out and repeat on the back of your design.

and your shirt is ready to wear!!

braided neckline tutorial


i was actually inspired to make this tutorial when i saw someone on pinterest post a tutorial about a banana republic shirt-unfortunately they couldn't figure out how to make the neckline so the tutorial was basically sewing a braid to the neckline.  but i'm pretty sure this how BR actually made the neckline-isn't it funny that i'm actually using a BR shirt for this tutorial??

so here's the inspiration:


you'll need:
-liquid stitch-or some other fabric glue-this will help the hole from fraying or stretching excessively
-scissors
-old shirt (make sure it's pretty long because you'll be cutting strips from the bottom)

and the how:

1.  first start by putting a dot of liquid stitch down around the neckline about 1-2" apart.  then cut 3 strips from the bottom of your shirt about 1/2-1" thick.  it's okay if they're on the thin side because you'll be doubling them anyway.  stretch the strips out a little bit-it's basically the same process as all those t-shirt bracelet/headband/necklace/millions of other accessories tutorials.  once your glue has dried, cut a small hole in each dot.  you can make them pretty small because they'll stretch out later and you def don't want them to be too big.  i just made tiny little snips with the tips of scissors.
2.  then tie a knot in the end of your 't-shirt yarn'.  starting at one side, pull the yarn all the way through the first hole.
3.  then take the end and pull it back through the same hole but not completely-leave a small loop.
4.  thread the yarn up through the next hole and through the loop you made previously.
5.  again, don't pull the thread all the way through-leave a small loop.
6.  thread the yarn through the next hole and through the loop.  and keep going all around the neckline.
7.  when you come to the end, instead of leaving a loop, just pull the yarn all the way through and it should keep the last loop secure.

and that's it!!  i really like the look of doubling up the t-shirt yarn, unfortunately cutting that much off the bottom makes the shirt borderline too short for me to wear...then again i have unusually large breasts for an asian girl, combine that with the long asian torso and i usually need pretty long shirts.

if you have 2 shirts that are similar colors you could cut up one for the yarn and have a contrasting neckline-you could use the rest of the yarn for other t-shirt  yarn accessories.

Sunday, February 12, 2012

chevron throw blanket

today i made a throw blanket (60"x45")!!  out of chevron fabric of course because i'm sure i'll never get tired of it...it was actually easier than i anticipated, until i got to the binding anyway.  definitely need to work on binding...  but it turned out pretty well for the first time i've ever tried binding a 'quilt'.  putting it together was pretty quick too-it only took me a couple hours.

supplies:
-batting
-fabric for the front and back (roughly 3 1/2 yards total)
-fabric for the binding
-safety/quilting pins

cut your fabric down to the same size as your batting-my fabric was 54" wide but if your fabric isn't wide enough you can trim the batting down or just double up.  you will want 1 piece for the front and 1 for the back (i used the same fabric for both).  then lay you pieces out-bottom up:
back fabric-right side down
batting
front fabric-right side up

pin all three layers together-it helps if you have a non-carpeted area to pin on otherwise you might end up pinning your blanket to the floor...  now check the info on your batting-mine said i could sew up to 10" apart but this may differ depending on the type and quality of your batting.  i ended up sewing about 6" apart (or along every 3 zigzags) so that's where i put my safety pins.  (quilting pins are basically the same as safety pins but they have a slight curve to them that makes this process somewhat easier-but regular safety pins work too.)

with all three layers pinned together it should already look pretty much like your blanket-now for the actual 'quilting' part.  again i decided to sew along the zigzags so they were pretty easy to follow-but you can pretty much make it up as you go-you can use a more loopy pattern or even actual shapes.  now that i'm thinking about it, it could be cool to make a solid pink one with a heart design sewn in it.  anyway, i don't have a quilting machine i used just a regular sewing machine and it turned out fine.

next, the binding-so halfway through cutting the strips i realized that i was actually doing it wrong...it's better to have your binding cut diagonally through your fabric rather than perpendicular/parallel to the fibers.  you can find a really good post about why this matters and how to make your own binding here.  next time i think i'll try the continuous binding method...  also i wanted my binding to be 1" thick so i cut the strips to be 3".

now to iron the millions of feet of binding you just made...i ended up cutting a strip of card stock about 1"x3" and folded it half and then folded each side in 1" so that it would mimic how i wanted my binding to be.  i pressed all the binding fabric in half then wrapped card stock around the fabric strips and used it as a guide-the folds will help pull the fabric in place.  you have to stop and adjust occasionally but it's still faster than pressing one side up 1" then pressing the other.

instead of sewing the back in place and hand stitching the front, i just sandwiched the blanket material inside of the binding and sewed all around the quilt.  this way you only have to do it once but you have to be really careful your binding is properly pressed and lined up as you sew.  when i came to the corners, i would sew all the way to the end, back stitch 1" (or the width of your binding), lift the foot, and miter the corners.  once you pull the binding along the next side the fabric should pucker up on the corner, just pull it over (toward the side you've already sewn) and it should form a neat fold.  now you can put the foot back down and continue sewing.

and that's it!!  who knew a throw blanket could be so easy...?

Sunday, February 5, 2012

produce mat


 when you buy meat do the packets ever leave behind weird gunky stuff in your fridge?  i never had that problem until i moved to hawaii-every time i buy meat produce it leaves behind weird gunk on the shelf in my fridge.  as a short term solution i just spread out a grocery bag underneath them but i finally got around to making a 'real' solution.

i made this mat out of the scraps of the canvas drop cloth i got a while back...i still have so much left to use!!

supplies:
-fabric
-freezer paper
-paint
-iron on vinyl (and iron of course)

i wanted my mat to be 15'x12' so i cut 2 rectangles 16"x13".  i looked up some animal silhouettes on google and traced them on to freezer paper-if you're cool you can print them, otherwise you'll just have to free hand them like me.  cut out your freezer paper stencil and iron onto your mat (along the bottom of the 12" edge).  once your stencil is ironed in place, you can start painting.  make sure the paint is completely dry before peeling the freezer paper off.  this was my first attempt at freezer paper stencils and i was pretty impressed by the clean edges.


next-iron on vinyl.  i actually bought this like...2 years ago??  and i'm just now using it...it was kind of an impulse buy at the time but it's proved itself useful.  anyway, i found it at hobby lobby but i haven't seen it anywhere else, not that i've been actively looking though.  

cut 2 pieces of vinyl that are the same size as your fabric-for me 16"x13".  fortunately the paper backing has gridlines so they ended up straighter than my actual fabric lol.  next, following the instructions that came with the vinyl, you want to peel the paper backing off the vinyl.  then set up a little fabric/vinyl/paper sandwich, so top down:
-paper backing (the instructions didn't specify but i put the shiny side down and dull side, with the grids, up)
-vinyl (sticky side down)
-fabric (right side up)

don't forget the paper-i definitely tried to iron the vinyl on without the paper...let's just say it did not work out well...  also, i'd use a lint roller on your fabric prior to putting the vinyl on.  i noticed afterwards that i actually trapped a couple hairs and a piece of hay in my mat...  

moving on...iron, iron, iron...with lots of pressure.  the instructions say medium pressure, but i'd put as much pressure as you can-i went over mine several times just to be sure.  and repeat for the other piece of fabric.  

now take the 2 pieces, right sides together, and sew down the two 16" sides forming a tube.  flip right side out, press the open edges in, and top stitch all the way around.  and your produce mat is ready to use!!

i didn't bother using any interfacing for this project because putting the vinyl on both pieces makes it a pretty thick mat.  however, my fabric was canvas so if you are using something pretty thin i'd recommend using some interfacing just for some added structure.  

i didn't have any problems with the vinyl sticking while sewing, but i read somewhere that if you put 2 pieces of scotch tape (i'm guessing the matte kind) on either side of the left side of the needle it helps the vinyl from sticking.