hello, i hope everyone had a good weekend!
today i'm reposting my tutorial on making a custom laptop sleeve, but this time i'm including photos for those of you who are visually inclined. i know i am!
-main fabric
-lining
-batting or fleece for padding
-4" strip of velcro
for the back: first start with the length and width of your laptop. add seam allowances on every side, and a flap (mine is 5") on one side. for a 13" macbook, i used 10" x 18". you will need to cut one piece main fabric, one lining, and one batting in these measurements.
for the front: again start with the length and width of your laptop. add seam allowances on all sides. on the right side, left side, and bottom, add the depth of your computer. one side should only have the seam allowance added! for a 13" macbook, i used 12" x 15". you will need to cut one piece main fabric, one lining, and one batting in these measurements.
next, baste the main fabric to the corresponding batting. read more about basting here. i will refer to the main fabric and batting basted together only as the main fabric from now on. take the front pieces of main fabric and lining, right sides together, and sew across the top. this should be the edge that only had the seam allowance added. flip right side out and press. you can add some topstitching here if you'd like. center and attach your velcro about 1 1/2 inches down depending on your flap size and laptop dimensions.
next box the corners of both front pieces. read more about boxing corners here.
now lay the front piece on top of the back piece of lining, right sides up for both. pin and sew in place.
now it should actually start looking like a laptop sleeve instead of just a pile of fabric. at this point you can check to make sure your laptop fits correctly before moving on. or just admire your work.
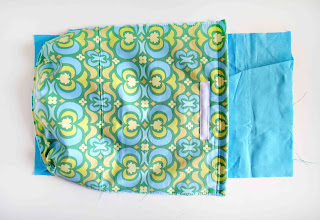
next lay back piece of main fabric on top of everything else, i folded it in the middle so you can see. pin and sew in place leaving a small opening on the top of the flap.
to close the flap topstitch all the way around. center and attach your velcro about 1 inch from the edge, depending on your flap.
if you're not particularly inclined to sew your own i have these for sale in my Etsy shop here.
linking up these blogtastic bloggers. happy crafting!


this is gorgeous - love your fabric choice!
ReplyDeleteIf you have time, I would love if you could hop on over and upload a photo of it into SewSet!
SewSet is a new on-line sewing directory for sewing patterns and free tutorials. It takes under 2 minutes to add your tute, and links directly back to your webpage.
Thanks, and great job on the laptop sleeve!
- Jess
www.sewset.com
hi
Deletethanks for the tip, i just signed up and will be posting soon!
lovely, simply lovely :)
ReplyDeletethank you!
DeletePS i love all the tutorials on your blog!!
Hello!
ReplyDeleteYou have such a beautiful blog!
Great tips :) I'm folowing you!
Take a look at my blog:
http://dreamyroots.blogspot.pt/
Looks awesome! Love the fabric too =)
ReplyDeleteThis is just lovely! I love the colors you chose.. soo pretty!
ReplyDeleteThanks for sharing with the Pink Hippo Party!
xoxo
Amie @ Pinkapotamus
Great tutorial! Love the fabric you chose.
ReplyDeleteFabrics are my favorites I like them a lot, it soothes me ever.
ReplyDeletePersonalized Laptop Sleeves
What a cute project! I love it so much that I decided to feature it in our roundup of DIY tech cases. Check it out here: http://www.favecraftsblog.com/diy-technology-cases/
ReplyDeleteHave a great day!
I made one today! My daughter got a new Macbook for Christmas and she asked me to make one for her. It was a little more complicated than I thought it would be, but I did it! It turned out really nice! Thanks for the tutorial!
ReplyDeleteHi! Thank you so much for the tutorial! I made one last weekend and it turned out very nice in spite of my batting being too thick. The article about how to box the corners helped a lot too. If you want to have a look at my sleeve, I blogged about it here: http://www.zakouf.com/?p=321
ReplyDeleteI'll certainly come back to this pretty blog on a regular basis : )
Hi I've started to make this but before I continue I just want to ask a question. When sewing the front (with lining attached and boxed end/side), is there a particular way to line it up when sewing to the back piece as it is not boxed so does not fit/match perfectly? Do I need to cut the corners round to fit the boxed corners or adjust to fit?
ReplyDeleteHi
DeleteYou should box the corners of the lining as well well as the outer fabric that way they are the same size all the way around. Sorry it's a little ambiguous.
Good luck!
Michelle
Thanks for posting an amazing post with incredible designs and ideas. Imprinting brand logo and designs always help to spread awareness and improve the goodwill of the company.
ReplyDeletecustom laptop bag
I'm inspired to start fixing computers after reading this! Western New York Computer Repair
ReplyDeleteCool
ReplyDelete